The Best Upscale Image Tutorial in Photoshop
The general rule has always been that you can make an image smaller than its original size, but you can't make it larger when resizing photos in Photoshop. If image quality is important to you, you can't make it larger. Photoshop only needs to remove a few pixels from the original image in order to reduce the size of the image. Although it may sound unpleasant, the outcome is the exact opposite. Usually, the smaller version turns out to be sharper than the original.
However, enlarging an image beyond its initial dimensions is a very different matter. In order to produce detail that wasn't there before, Photoshop needs to add pixels. And if you're thinking that sounds horrible, you're right. Photoshop can only make educated guesses about the new pixels' appearance before attempting to merge them into the existing pixels. The outcomes weren't very good. Depending on the upsampling technique you employed, your larger version typically came out either chunky and oversharpened or soft and dull.
That's how it used to be, at least. But Preserve Details 2.0, a new upscaling method, was added in Photoshop CC 2018. It's a type of follow-up to the original Preserve Details algorithm that was included in a previous Photoshop update. The most cutting-edge upscaling technology Photoshop has ever seen is Preserve Details 2.0. And if you're still of the opinion that enlarging an image will result in it being awful, Adobe and Photoshop are on a mission to disprove you. We'll see how it functions.
Open your image in Step 1
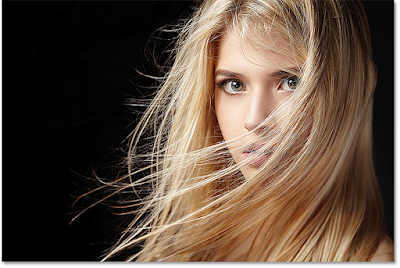
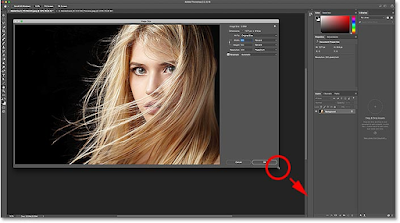
To magnify an image, first open it. I'll use this image to demonstrate how well Preserve Details 2.0 can preserve skin texture in addition to fine details like the eyes and hair:
Make sure "Preserve Details 2.0" is enabled in step two.
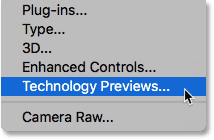
Preserve Details 2.0 is bundled with Photoshop CC 2018, however it isn't yet a part of Photoshop. Adobe views it as a technological preview, therefore we must enable it in order to use it. The Photoshop Preferences are where we do it. Go to the Edit menu in the Menu Bar on a Windows computer. Navigate to the Photoshop CC menu on a Mac. Select Technology Previews after selecting Preferences.
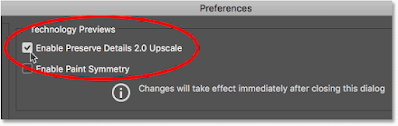
This brings up the Technology Previews preferences dialog box. To exit the dialog box, make sure Enable Preserve Details 2.0 Upscale is checked, and then click OK:
Open the Image Size Dialog Box in Step 3
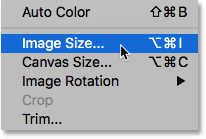
By selecting Image Size from the Image menu up top, you can access Photoshop's Image Size dialog box:
Click and drag the Image Size dialog box's bottom right corner outward to enlarge it so you can see more of your image in the preview area:
Fourth step: choose "Resample"
Make sure Resample is chosen in the resizing menu on the right. This signals to Photoshop that we wish to alter the image's actual size. To put it another way, we'd like to add or delete pixels:

Change the width and height in Step 5

Fill in the Width and Height fields with the image's new dimensions. Since Width and Height are by default connected, adjusting one also changes the other. Let's push things past reason by setting both the Width and Height to 400% since our objective is to just observe how much of a difference Preserve Details 2.0 can make:
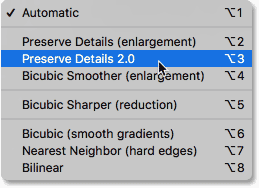
Step 6: Switch To "Preserve Details 2.0" For The Resample Method.

Photoshop's process for adding or deleting pixels is called the resampling method, and it is usually set to Automatic. This implies that Photoshop will pick the ideal algorithm for the task at hand on its own. Ideally, that is the case:
The issue is that, although if Preserve Details 2.0 has been activated in the Preferences and is, as we will see in a moment, by far the greatest option for expanding photographs, Photoshop will not select it when Resample is set to Automatic. In its place, it will make use of the original Preserve Details method that was first made available in a previous release of Photoshop CC. Once Preserve Details 2.0 is formally integrated to Photoshop, this will probably change. However, we must choose Preserve Details 2.0 ourselves for the time being in order to use it.
To get a list of all the resampling algorithms available to us, click on the phrase "Automatic." At the top are the ones for enlarging the image. Choosing Preserve Details 2.0. You should check that Preserve Details 2.0 is enabled in the Preferences if you aren't seeing it.
A Sneak Peek at the Results
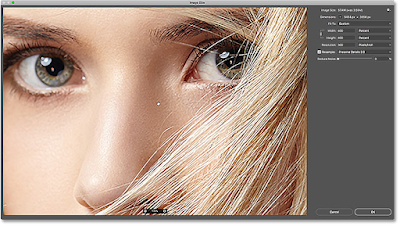
The preview window on the left will refresh as soon as you choose Preserve Details 2.0 to show you how your upscaled image will appear when using this new option. To explore various sections, drag your image around inside the preview window:
Post a Comment for "The Best Upscale Image Tutorial in Photoshop"